Stable Diffusion (SD) is a Generative AI model that uses latent diffusion to generate stunning images. This deep learning model can generate high-quality images from text descriptions, other images, and even more capabilities, revolutionizing the way artists and creators approach image creation. Despite its powerful capabilities, learning to use Stable Diffusion effectively can have a steep learning curve.
Before diving into the practical aspects of Stable Diffusion, it is important to understand the inner workings of this model. While it shares some core concepts with other generative AI models, there are also core differences. The latent spaces concept and diffusion processes are shared, but Stable Diffusion (SD) has a unique architecture and training methodologies.
By understanding how SD works, you will gain the knowledge needed to use this model, craft effective prompts, and even fine-tune. So, let’s start by answering some fundamental questions.
What is Stable Diffusion?
Stable Diffusion is a latent diffusion generative model made by researchers at CompVis. Those latent diffusion models came from the development of probabilistic diffusion models which depended on early methods that use probability to sample images. After GANs and VAEs, latent diffusion came as a powerful development in image generation with many capabilities. Those capabilities are a result of the integration of attention mechanisms from Transformers.
- Text-to-image: conditioning generation based on text prompts.
- Inpainting: Masking a part of an image and generating in its place.
- Super Resolution: Increasing image quality
- Semantic Synthesis: Generating Images based on Semantic Masks.
- Image conditioning: Condition the generation based on an image, creating image variations or upscaling the image.
These capabilities made latent diffusion technology a state-of-the-art method for image generation. Later, when the model checkpoints were released, researchers and developers made custom models, making Stable Diffusion models faster, more memory efficient, and more performant. Since its release, newer versions have followed, such as the ones below.
- SD v1.1-1.4: These were released by CompVis with 256×256 and 512×512 resolutions and almost a million training steps for the 1.4.
- SD 1.5: Released by RunwayML with different weights resuming from previous checkpoints.
- SD 2.0-2.1: Trained from scratch by Stabilityai, has up to 768×768 resolution with great results.
- SD XL 1.0/Turbo: Also from Stability AI, this pipeline utilizes an SD base model to deliver stunning results and improved image-to-image features.
- SD 3.0: An early preview of a family of models by Stabilityai as well. With parameters ranging from 800M to 8B, taking us to a new level of realism in image generation.
Let’s now look at the basic architecture of Stable diffusion models and their inner workings.
How Does Stable Diffusion Work?
Generally speaking, diffusion models are trained to denoise random noise called Gaussian noise step by step, until we get to the sample of interest which is the image. Diffusion models are probability-based, predicting the likelihood of an image’s appearance.
These models showed great results, but the downside was the speed and resource-intensive nature of the denoising process. Denoising is a sequential process, happening in the pixel space, which can become huge with high-resolution images.
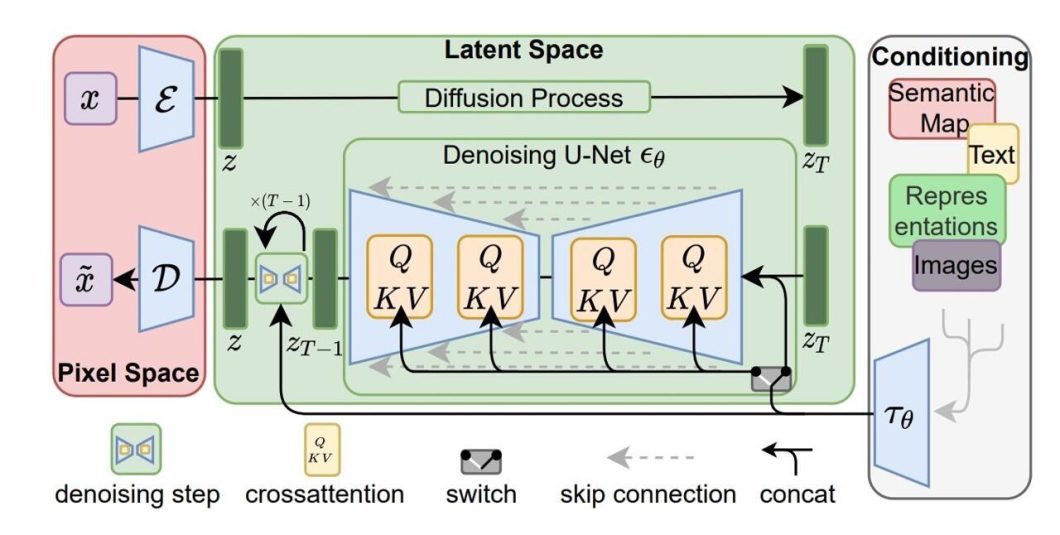
The latent diffusion architecture reduces memory usage and computing complexity by applying the diffusion process to a lower-dimensional latent space. This distinguishes latent diffusion models like Stable Diffusion from traditional ones: they generate compressed image representations instead of using the Pixel space. To do this, latent diffusion has the components below.
- U-Net Backbone: Using the same U-Net as previous diffusion models but with the addition of cross-attention layers for the denoising process.
- VAE: An encoder encodes input images to latent representations for the U-Net, while a decoder transforms the output back into an image.
- Conditioning: Allows latent diffusion models to be conditioned in multiple ways, for example, text conditioning allows for text-to-image generation.
During inference, the stable diffusion AI model takes a latent seed and a condition. The seed is used to generate a random image representation and the condition is encoded respectively.
For text-to-image models, the CLIP-ViT text encoder is used to generate text embeddings. The U-Net then denoises the generated noise while being conditioned. The output of the U-Net is then used to compute a denoised latent image representation via a scheduler algorithm.
Now that we have enough knowledge of Stable Diffusion AI and its inner workings, we can move to the practical steps.
Getting Started With Stable Diffusion
Image generation models, especially Stable Diffusion, require a large amount of training data, thus training from scratch is usually not the best path with these models. However, inference and fine-tuning are great ways to use Stable Diffusion models.
In this section, we will delve into the practical side of using Stable Diffusion. The setup of our environment will be on Kaggle notebooks, which provides free access to GPUs to run the model. We’ll leverage the Diffusers library to streamline the process, and for this guide, we’ll focus on Stable Diffusion XL 1.0, for different types of inference and parameter tuning. We’ll then look at fine-tuning and the process it involves.
Set Up on Kaggle Notebooks
Kaggle notebooks provide good GPU options and an easy setup to work with. Stable Diffusion XL (SDXL) can be heavy to run locally, so using a hosted notebook is beneficial. While other options like Google Colab are available, they no longer allow Stable Diffusion models to be run on it.
So, to get started, log in or sign up to Kaggle and create a new notebook. Once that’s open you can now see the default notebook view.
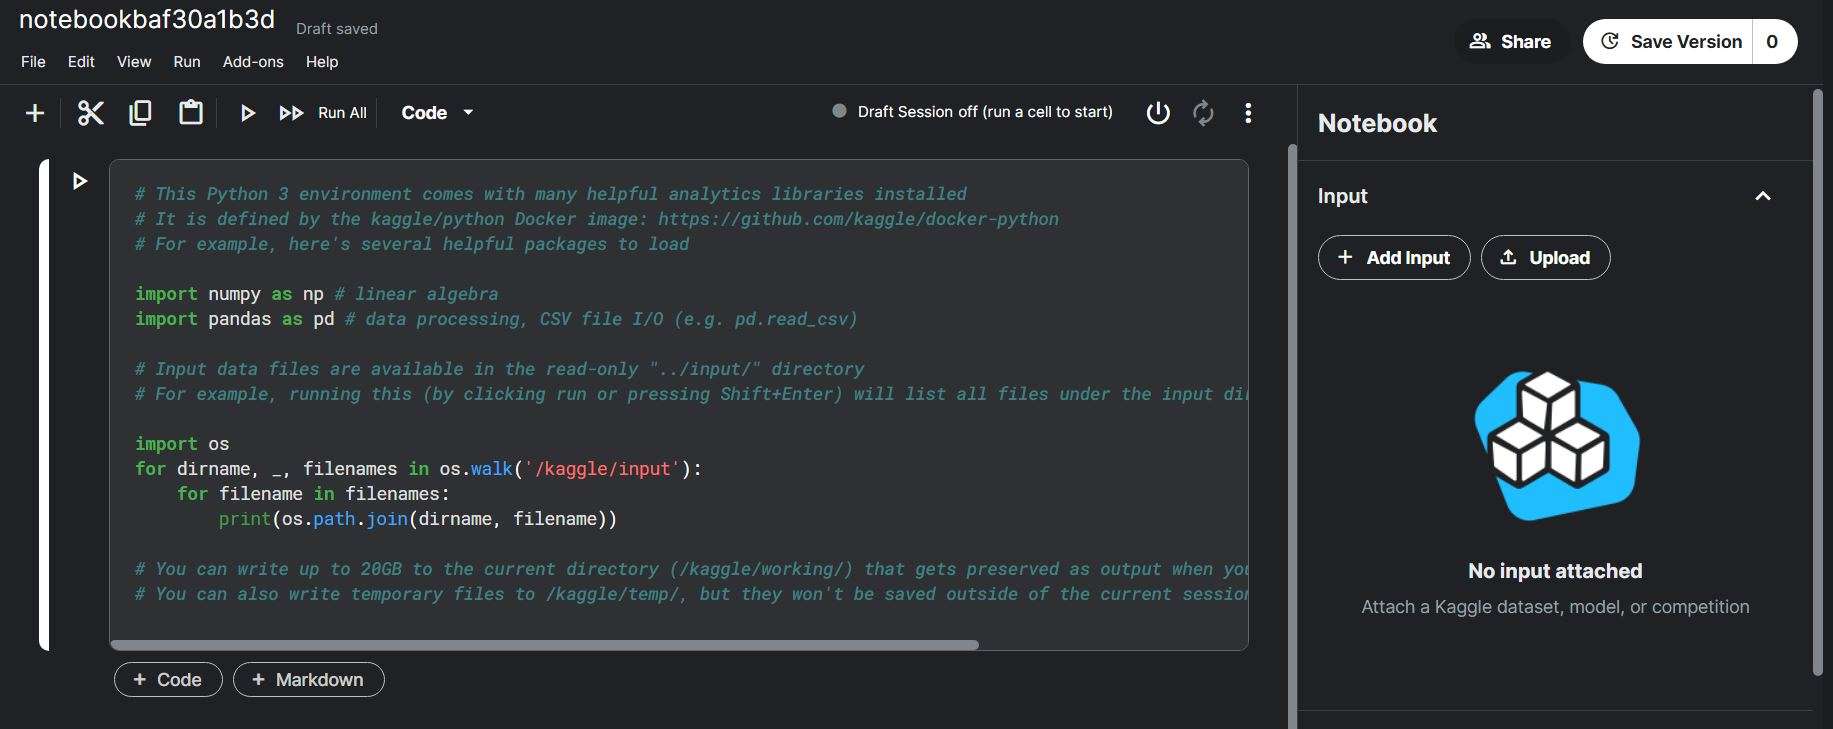
You can rename the notebook in the top left corner. Next, let’s delete that default cell as we won’t be needing it by right-clicking and deleting the cell. Before starting with the code, let’s also set up the GPU for a smooth run.
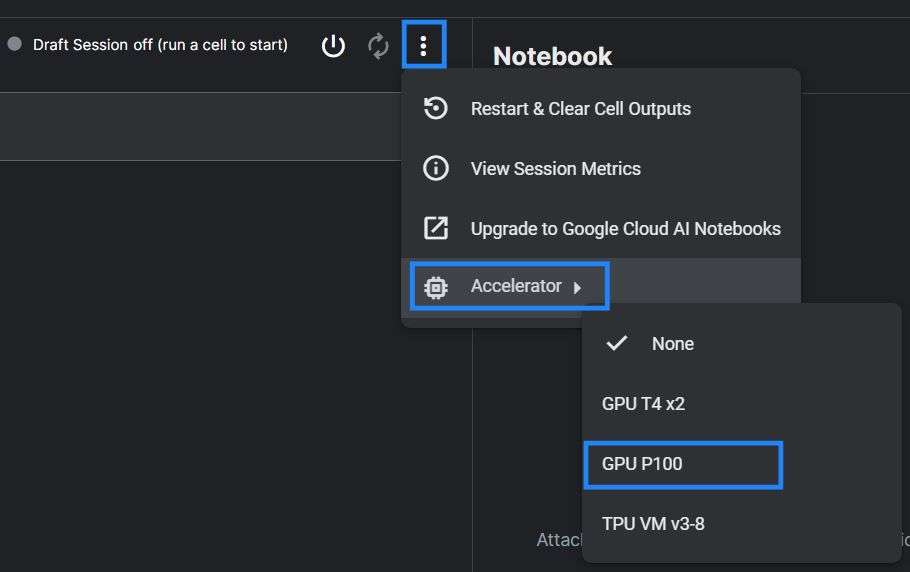
Go to the 3 vertical dots, choose accelerator, and then the P100 GPU. P100 is a good GPU option that will allow us to run SDXL. Now that we have that setup, press the power button, and let’s get the notebook running. To start with our code, let’s install the needed libraries.
pip install diffusers invisible_watermark transformers accelerate safetensors xformers --upgrade
After installing the libraries, next we use the Stable Diffusion XL.
Generating Your First Image
Add a code block and then use the following code to import the libraries and load the Stable Diffusion XL pipeline.
from diffusers import DiffusionPipeline
import torch

pipe = DiffusionPipeline.from_pretrained("stabilityai/stable-diffusion-xl-base-1.0", torch_dtype=torch.float16, use_safetensors=True, variant="fp16").to("cuda")
This code may take some time to run, so let’s break it down. We import the DiffusionPipeline from the diffusers library, torch is PyTorch, allowing us to work with tensors.
Next, we create the variable pipe, which contains our model. To load the model, we use the DiffusionPipeline and give it the first parameter, which is the model repository identifier from Hugging Face Hub, “stabilityai/stable-diffusion-xl-base-1.0”. The torch_dtype=torch.float16 parameter sets the data type to be 16-bit floating point (FP16) to give faster computation and reduced memory usage.
The variant parameter specifies that we used FP16, and then the use_safetensors parameter specifies to save the model as a safe tensor. The last part is “.to(“cuda”)” which moves the pipeline to the GPU.
The last step before we infer the model is to make the generation process faster and more efficient.
pipe.enable_xformers_memory_efficient_attention()
Next, let’s create an image!
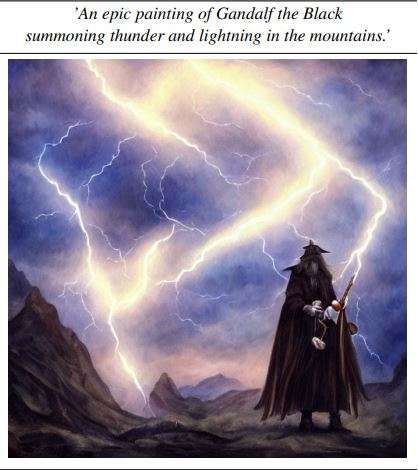
prompt = "A Cat riding a horse and holding a sword"

images = pipe(prompt=prompt).images[0]
The prompt is adjustable, adjust it to whatever you want. When you run it, inference should start and your image should be saved in the images array. Let’s look at the generated image.
from PIL import Image
import matplotlib.pyplot as plt
images.save("knight_cat.png")
import matplotlib.pyplot as plt
plt.imshow(images)
plt.axis('off')
plt.show()
This code will save your output image in the output folder on the right side of the Kaggle interface named “knight-cat.png”. Also, we display the image using the Matplot library. Here is what the output looked like.

Advanced Text-To-Image Generation
That output looked cool, but what if we want more control over the image generation process? We can do that using some advanced features. Let’s explore that. We need to load an additional pipeline that will allow us more options over the generation process, which is the refiner pipeline. Assuming you still have your notebook running and the Stable Diffusion XL pipeline loaded as pipe, we can use the below code to load the refiner.
refiner = DiffusionPipeline.from_pretrained(
    "stabilityai/stable-diffusion-xl-refiner-1.0",
    text_encoder_2=pipe.text_encoder_2,
    vae=pipe.vae,
    torch_dtype=torch.float16,
    use_safetensors=True,
    variant="fp16",
).to("cuda")
The refiner has similar parameters to the SDXL pipeline but with a few additions like the “VAE” parameter which takes the VAE from the pipe we loaded, and the same for the text encoder. Now that we loaded the refiner, we can define the options to adjust the generation.
n_steps = 60
high_noise_frac = 0.75

prompt = "Neon-lit cyberpunk city, rain-slicked streets reflecting the vibrant signs, flying vehicles, lone figure in a trench coat disappearing into an alley."
These options will affect the generation process greatly, the n_steps determines the number of denoising steps the model will take. The high_noise_frac is a percentage value determining how much work to split between the base model (pipe) and the refiner. In our case, we tried 0.75, which means the base model does 75% (45 steps) of the work, and 25% by the refiner (15 steps).
Before generating an image with our settings, we could take an additional step that will help us reduce GPU memory usage.
pipe.enable_model_cpu_offload()
Now, to run inference on both pipelines, we can do the following.
image = pipe(
    prompt=prompt,
    num_inference_steps=n_steps,
    denoising_end=high_noise_frac,
    output_type="latent",
).images
image = refiner(
    prompt=prompt,
    num_inference_steps=n_steps,
    denoising_start=high_noise_frac,
    image=image,
).images[0]
Running this will run both the refiner and the Stable Diffusion XL pipeline with the settings we defined. Then we can display and save the generated image just like before.
import matplotlib.pyplot as plt
images.save("cyberpunk-city.png")
plt.imshow(image)
plt.axis('off')
plt.show()
Here is what the output looks like.
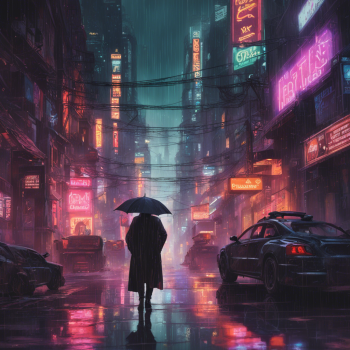
Trying different values for the “n_steps” and “high_noise_frac” will allow you to explore how they make a difference in the generated image. A quick tip: Try using different prompts for the refiner and base.
Exploring Other Features
We previously mentioned the capabilities of Stable Diffusion in other tasks like image-to-image generation and inpainting. We can use almost the same code to use those features, reading the documentation can be helpful as well. Here is a quick code to use the image-to-image feature, assuming you have run the previous code.
from diffusers import AutoPipelineForImage2Image
from diffusers.utils import load_image, make_image_grid
pipeline = AutoPipelineForImage2Image.from_pipe(pipe).to("cuda")
url = "https://huggingface.co/datasets/huggingface/documentation-images/resolve/main/diffusers/sdxl-text2img.png"
init_image = load_image(url)
prompt = "a cat wearing sunglasses in the jungle"
image = pipeline(prompt, image=init_image, strength=0.8, guidance_scale=10.5).images[0]
make_image_grid([init_image, image], rows=1, cols=2)
This code will use an example image from the HuggingFace datasets as the condition and load it through the URL. You can use your image there. We are loading the image-to-image pipeline, but to save memory we load it from our already loaded pipe.
There are parameters like strength that control the influence of the initial image on the final result. The guidance scale determines how closely the model follows the text prompt. Below is what the output looks like.
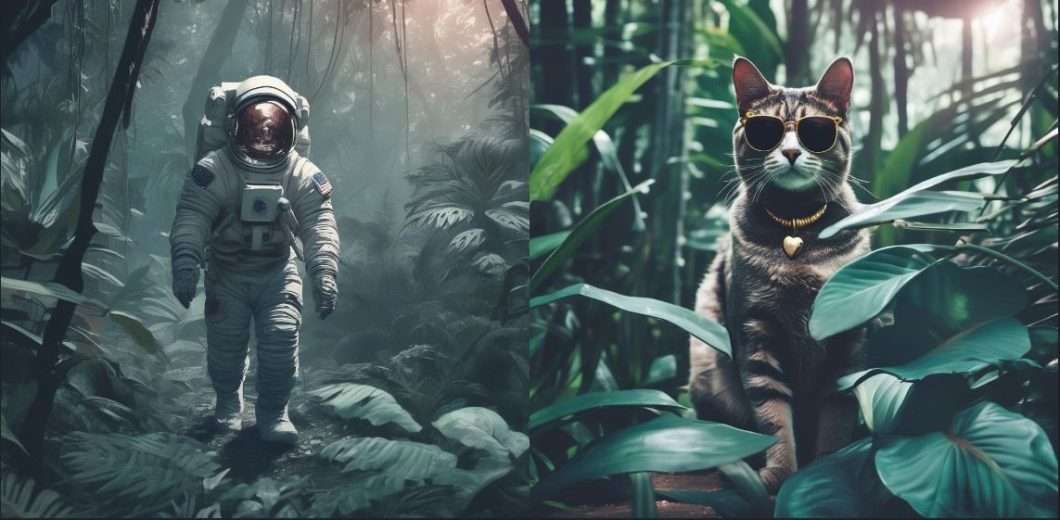
We can see how the generated image (on the right) followed the style of the condition image on the left. Image-to-image generation is a cool feature with Stable Diffusion showing the power of the latent diffusion model architecture and the different conditions we can have. Our advice is to explore the documentation and try different tasks, parameters, or even other Stable Diffusion versions. The code is similar, so go out there and explore.
Older versions like SD 1.5 could even allow more complex tunings for the parameters, and maybe even a wider range of tasks. Those models can perform well and use fewer computational resources, potentially allowing for better experimentation. To take the next step towards mastering Stable Diffusion AI, let us explore fine-tuning.
Fine-Tuning Stable Diffusion
Fine-tuning or transfer learning is a technique used in deep learning to further train a pre-trained model on a smaller, targeted dataset. This allows the model to maintain its capabilities, but also gain new specified knowledge. So, we can take a model like Stable Diffusion, which has been trained on a massive dataset of images, and refine it further on a smaller, more focused dataset.
Let’s explore how this works, its uses, and popular techniques for Stable Diffusion fine-tuning.
What is Fine-tuning and Why Do It?
Generalization is a big drawback when it comes to computer vision or image generation models. This is usually because you might have a specific niche use that was not represented well in the model’s training data. As well as the inevitable bias in computer vision datasets.
This approach usually involves a few steps, such as collecting the dataset, preprocessing, and cleaning it according to the expected input of Stable Diffusion. The dataset will usually be hundreds or thousands of images, which is still much smaller than the original training data.
The main concept in fine-tuning is freezing some layers, which is done by retaining the initial layers of the model, that usually capture basic features and textures, unchanged or frozen. While later layers are adjusted and continue training on the new data.
Another important metric is the learning rate, which determines how much a model’s weights are adjusted during training. However, fine-tuning has several advantages and drawbacks.
Advantages:
- Performance: Allowing Stable Diffusion to perform better in a specific niche.
- Efficiency: Fine-tuning a pre-trained model is much faster and more cost-effective than training from scratch.
- Democratization: Making models more accessible through different niches.
Drawbacks:
- Overfitting: Fine-tuning with the wrong parameters can lead the model to overfit, forgetting its general training data.
- Reliance: When fine-tuning a pre-trained model we rely on the previous training it had to be sufficient to continue. Also, if the original model had biases or security issues, we can expect those to persist.
Types of Fine-tuning for Stable Diffusion
Fine-tuning Stable Diffusion has been a popular destination for most developers. A few methods have been developed to fine-tune those models easily, even without code.
- Dreambooth: a fine-tuning technique that can teach Stable Diffusion new concepts using only (3~5) images. Allowing anyone to personalize their model using a few images of the subject. (Applied to Stable Diffusion 1.4)
- Textual Inversion: This approach allows for learning new ideas from just a few example images. It accomplishes this by creating new “concepts” within the embedding space of the text encoder utilized in the image generation pipeline. These specialized concepts can then be integrated into text prompts to provide very granular control over the generated images. (Applied to Stable Diffusion 1.5)
- Text-To-Image Fine-Tuning: This is the classical way of fine-tuning, where you would prepare a dataset according to the expected format and train some layers of the model on it. This method allows for greater control over the process, but at the same time, it is easy to overfit or run into issues like catastrophic forgetting.
What’s Next for Stable Diffusion?
Stable Diffusion AI has improved the world of image generation forever. Whether it’s generating photorealistic landscapes, creating characters, or even social media posts, the only limit is our imagination. Researchers are using Stable Diffusion for tasks other than image generation, like Natural Language Processing (NLP) and audio tasks.
When it comes to real-world influence, we are already seeing this in many industries. Artists and designers are creating stunning graphics, artwork, and logos. Marketing teams are making engaging campaigns, and educators are exploring personalized learning experiences using this technology. We can even go beyond that with video creation and image editing.
Using Stable Diffusion is fairly easy through platforms like HuggingFace or libraries like Diffusers, but new tools like ComfyUI are making it even more accessible with no-code interfaces. This means more people can experiment with it. However, as with any powerful tool, we must consider ethical implications. Things like deepfakes, copyright infringement, and biases in the training data can be a real concern and raise important questions about responsible AI use.
Where will Stable Diffusion and generative AI take us next? The future of AI-generated content is exciting, and it’s up to us to take a responsible path, ensuring this technology enhances creativity, drives innovation, and respects ethical boundaries.
If you enjoyed reading this blog, we recommend our other blogs:
-
- The 10 Top Applications of Computer Vision in Retail
- AlphaPose: A Comprehensive Guide to Pose Estimation
- StyleGAN Explained: Revolutionizing AI Image Generation
- Top Applications of Computer Vision in Agriculture