There are many reasons why Computer Vision is difficult, and most computer vision projects never make it to production. Software algorithms, cloud infrastructure, and Edge Computing hardware components must align perfectly to kick off a new Edge AI project. The high level of complexity for such AI vision systems often results in exhausted budgets, delayed deadlines, or ROI metrics that are not met.
At the same time, new computer vision applications appear every day across a wide range of industries. These use cases bring disruptive power to traditionally manual processes by automating time-consuming tasks or by introducing innovative products or services.
Why implement computer vision?
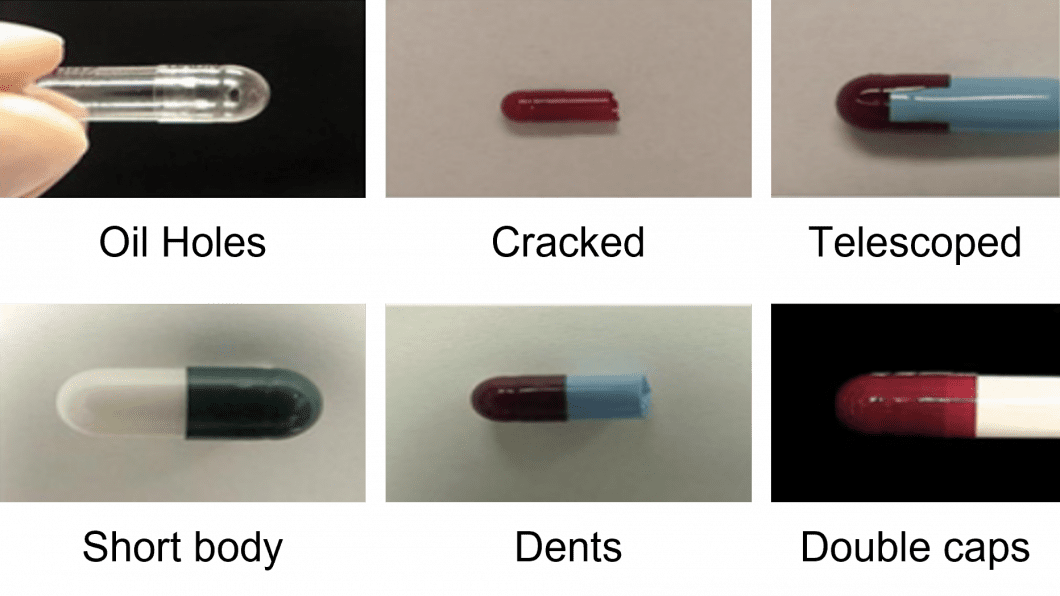
Due to its visual nature, it’s not hard to imagine the sheer number of possibilities of computer vision. From identifying historic buildings to classifying manufacturing to defects to internal organ segmentation, there is no shortage of imaginative solutions to be implemented with computer vision. However, the trouble getting started stems from getting these AI project ideas off the ground.
But, where should you actually start? At viso.ai, we have helped build many enterprise computer vision projects and helped develop a straightforward approach for getting these off the ground.
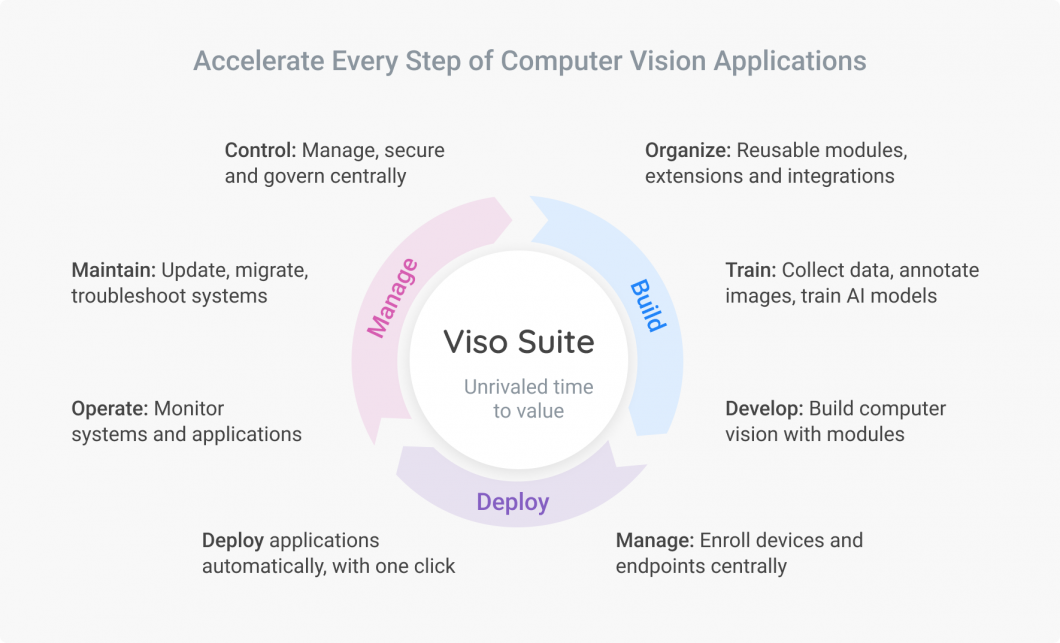
Whether you are using computer vision for an enterprise-grade application or a fun project, the full development lifecycle typically includes nine key steps:
- Data Collection
- Data Annotation
- Model Training
- Application Development
- Application Deployment
- IoT Connection
- Analytics Monitoring
- Maintenance and Debugging
- Securing and Protecting
However, before even entering the ML lifecycle, we need to perform the necessary prep work. In this article, we’ll walk you through how to structure your application idea and demonstrate how to productize your next artificial intelligence (AI) computer vision project. This prep work includes the following four steps:
- Detailing the Computer Vision Project
- Determining the Features Required
- Compiling Necessary Visual Materials and Resources
- Starting the Project

Setting up your computer vision project
Step one: ironing out the details
The very first step in the computer vision application prep work is to create your project description. This will identify who your stakeholders are and inform them of the key project deliverables. Additionally, this project description will provide those involved with the same level of understanding and support the process of translating the business requirements into technical tasks later on.
The project description should include the following dimensions:
- Project Name and Purpose: Make sure to state a clear and narrow focus.
- Business Goals: Define what success looks like and identify the value drivers.
- Timeline and Milestones: Define the milestones, and estimate the time needed per milestone.
- Stakeholders: Don’t forget to take privacy and security stakeholders into account.
- Locations of Endpoints: Define the expected scenery and environment.
- Hardware: State what cameras or servers are supposed to be (re-)used for testing.
- Available Infrastructure: Focus on the availability of power supply and internet connectivity.
Bonus: At this stage, it can be useful to assign and track responsibilities and deliverables in a Gantt chart. The Gantt chart allows users to easily visualize timelines and track the progress of tasks within the project.
Step two: name the features
As for any artificial intelligence project, the software developed must fulfill certain requirements and perform a set of features. The biggest risk is that a project becomes overloaded before it has even started. The more features added, the more complex it becomes.
- Define one core feature: Keep this as narrow as possible. The core feature should be closely related to the main project’s value drivers and determine the project’s technical nature (e.g., what method or computer vision task will be applied). The core feature will be fundamentally unchanged later and validated in a basic prototype, or proof of concept.
- Define a Set of Additional Key Features: This will add more functionality and increase the product value. This should try to be identified in the 2-3 most important features (never more than 5) and call them “must-have” software characteristics.
Most of the time, building a feasibility study or proof of concept is enough to start the project without added complexity. Particularly, most Visual AI-based projects start with simple ideas such as people counting, facial recognition, or defect detection.
Nice-to-have features are not particularly relevant at this early stage of development. Instead, we can add these features at later stages in the project. At this point, it is imperative to only focus on what is essential to getting the project off the ground.
Step three: prepare the Visual Material and Resources
Eventually, all computer vision projects will be based on sample visual material or training data. This is comprised of visual material as input for AI inferencing and model training. Once the computer vision models are trained on enough high-quality, relevant visual data, they will be useful for implementation in real-world scenarios when the computer vision project is up and running.
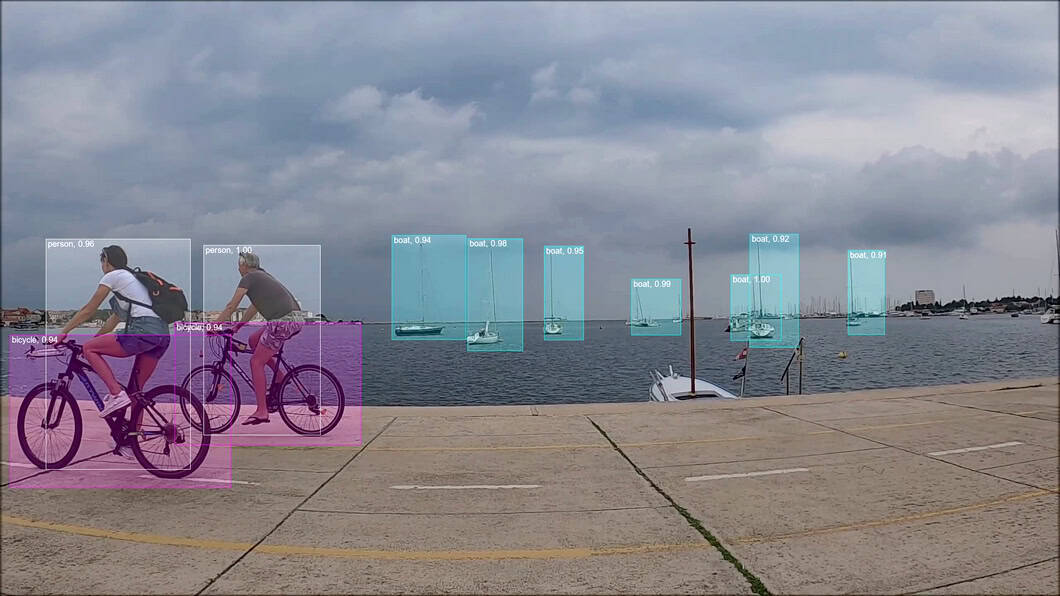
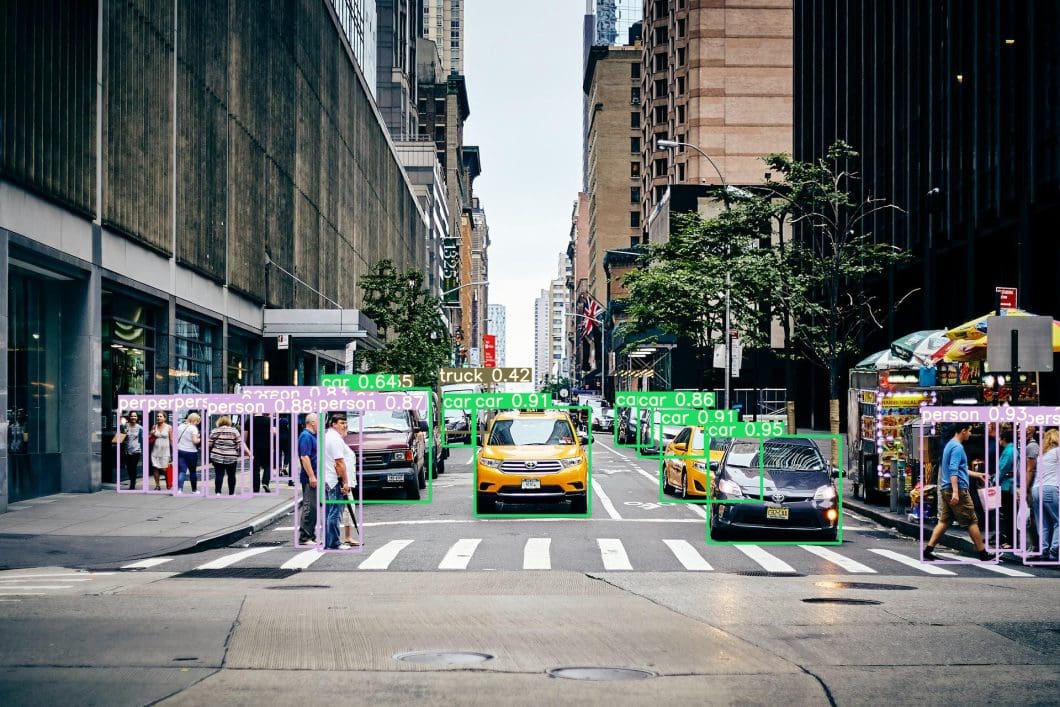
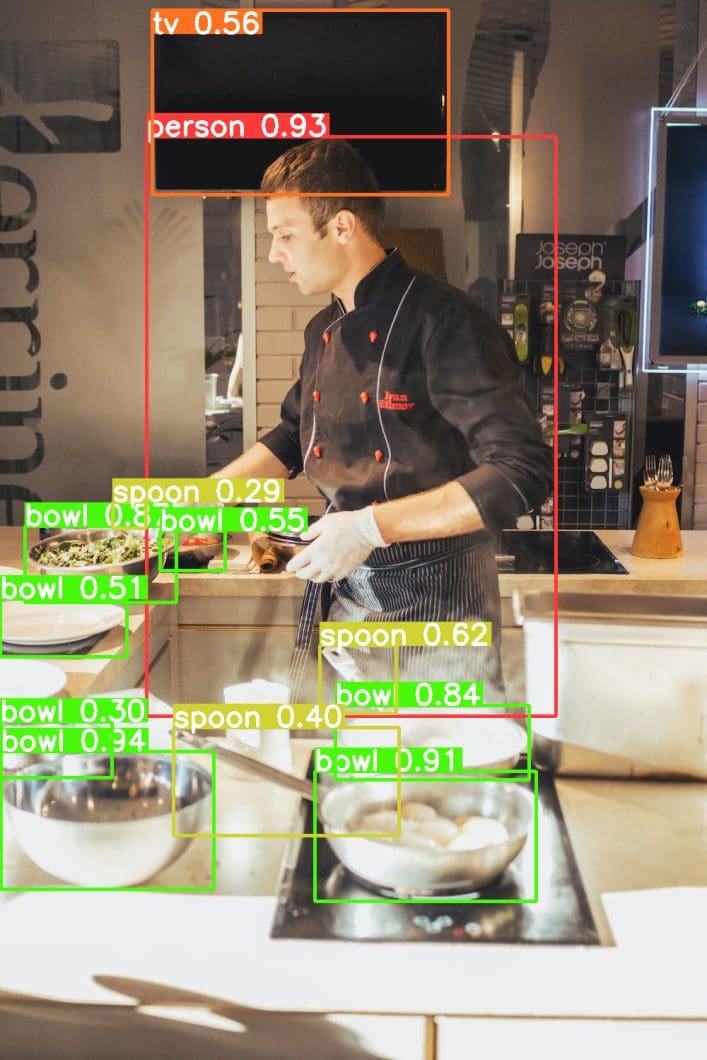
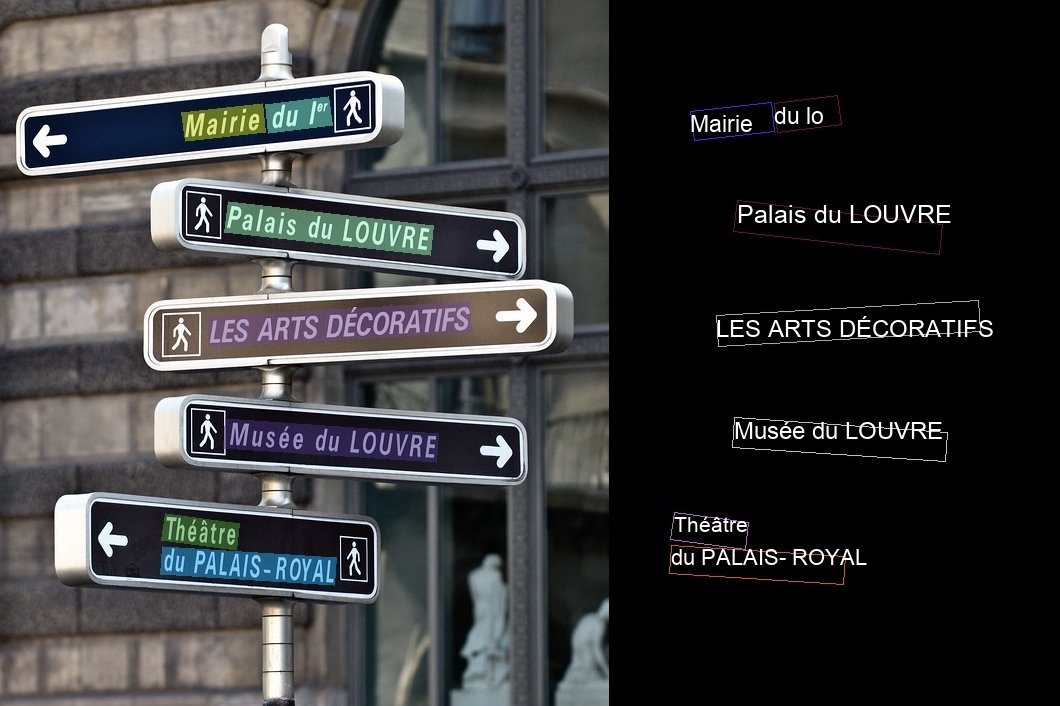
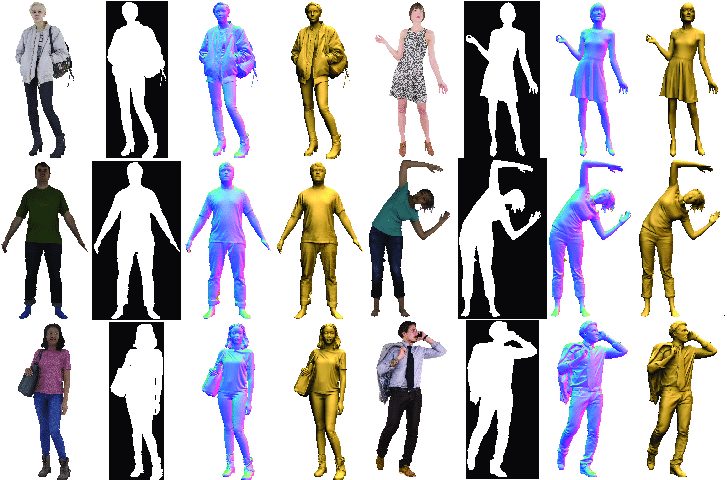
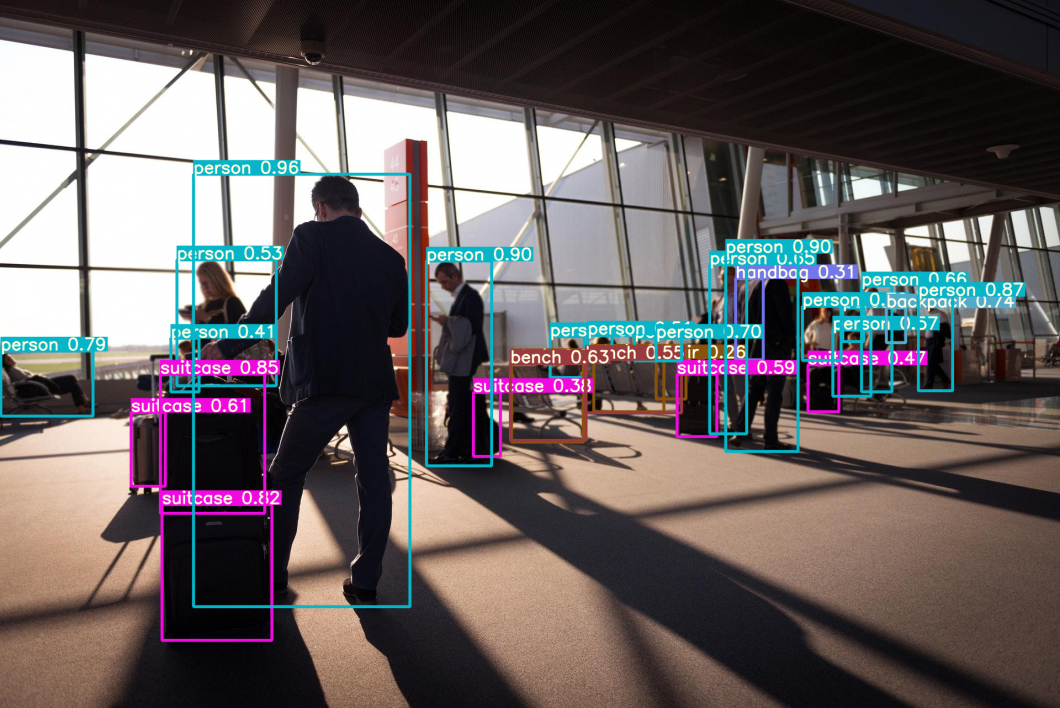
Hence, we apply the pre-trained models, such as convolutional neural networks (CNNs) to applications like object detection, object tracking, human pose estimation, pattern recognition, etc. While initial features, timelines, or administrative components are important, the project won’t get off the ground without proper visual training material.
In evaluating the quality of visual material, it is imperative to consider the following three characteristics:
- Video Scenario: To start, the video material does not need to reflect the exact and final setting. However, this data should be representative of the product use case. E.g., we often use a set of up to 10 sequences. For most cases, the sequences should not be shorter than 10 seconds and no longer than 1 minute.
- Camera Type: The fastest and easiest way of getting started is to set up an IP camera or USB camera connected to any video recording device. For AI vision, no special AI cameras are required because any digital video input can be processed. Sometimes, the webcam of a laptop or a mobile phone camera can do the job too. If you have existing cameras available, i.e. digital CCTV cameras, these can be used too (with a Network Video Recorder, NVR).
- Video Quality: Make sure the video samples reflect the actual scenario as closely as possible regarding lighting, colors (some algorithms require colors, IR night vision videos won’t work), contrasts (low contrast is better), and distance to objects (the larger the object size, the better). Use a lower image resolution (640p or 720p) for higher accuracy and overall better results because you will achieve significantly higher FPS (frames per second) with the same computer, server, or AI hardware in general. The camera used does not need to have the final image resolution, nor does it need to fulfill the definitive hardware specifications. In most projects, we evaluate and identify these factors later on when cost factors come into play (especially when computing hardware is a cost driver).
The goal is to create a set of videos with the camera, angle, and scenery that you think might be practicable to implement later and show the objects of interest clearly. That way, the first feasibility tests run smoothly, and changes to the setting or the AI model are easily identifiable. Often it is much easier to adjust the setting, for example, by optimizing the distance to the object of interest.
In certain situations, it can be difficult to acquire visual material that meets the above requirements. In these cases, it can be useful to supplement real-world visual data with synthetic data. While artificially generated, this synthetic visual data can still be representative of real-world situations, images, and videos, and useful for training models and compiling datasets of objects of interest.
Step four: start computer vision projects as early as possible
To minimize the time to start timeline, you must carry out the following steps:
- Setting Testing and Benchmarking: In most cases, we test the feasibility of a new vision AI idea with minimal financial effort. So, we use video samples and tests to adapt technical specifications iteratively.
- Setting Optimization: Optimization is key when using AI inference in a real-world use case. The key metric we use is Cost/FPS, aka hardware costs relative to frames per second. Some use cases don’t require high FPS because insight quality does not always increase with more FPS. Changes to the hardware setup or the processing logic can lead to dramatic cost savings. For example, using a camera with a lower resolution requires significantly less computing power – while achieving the same overall product performance (accuracy).
The challenges and opportunities will definitely come into perspective once you begin working with real visual data. Once the first results are available, questions about computing performance, the need for real-time processing, or the optimal balance between algorithm performance and costs will follow automatically. This time you will be able to back your decisions on how to move forward with data from your proof of concept.
What’s next with computer vision projects?
Getting computer vision and visual deep learning projects off the ground requires quite a bit of initial grunt work. A structured and scalable approach can help you to kick this process off. Learning AI should be a hands-on experience and developing your first successful project can take several attempts. For help implementing and getting your real-world applications off the ground, message our team for a demo of Viso Suite.
To gain a more advanced level of computer vision applications, news, techniques, and more, check out some of our other blogs:
- Why do Computer Vision Projects Fail?
- The Most Promising Computer Vision Applications
- The Top 5 Deep Learning Frameworks
- Home Robots: the Stanford’s Roadmap Paper
- YOLOv8 for State-of-the-Art Open Source Computer Vision Techniques
- Understanding Natural Language Processing (NLP)